Thursday, September 19, 2013

The Vest Is Yet To Come!


Today I made Michael his houndstooth wool knit vest.

I don't want to say it came out better than my long-sleeve sweater, but the second time working with this sweater knit, I felt much more on top of my game.

For a pattern, I used a different view from Simplicity 9993 -- a long-sleeve V-neck sweater.  I just left off the sleeves, lowered the armhole a bit, and added a waistband.


I had more than enough houndstooth; in fact, I probably still have enough for a couple of dog coats.

The big challenge on a V-neck is, of course, making a perfect V on the neckband and attaching it.  I did not want to make a neckband with an overlap at the front like I've made on knit jersey shirts; I wanted a true V.  I used the Simplicity pattern piece, made a sample to test it out, and proceeded.


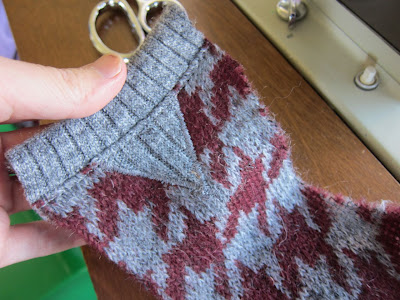
Before attaching the neckband, I interfaced the front of the V on the sweater, since I'd have to clip into it, 5/8" deep.  I used a weft weight knit interfacing I had on hand.


Then I carefully, carefully stitched on the neckband. 

Here's what it looks like from the inside (this is the underside of the neckband).  The gray at the center point is the corner of my neckband; the black is the interfaced part of the V on the sweater itself.


And from the outside.


For the armhole bands, I measured the armholes and cut the bands about 2-3" smaller.  As with the neckband, I attached the band to the sweater with my sewing machine and then serged over the stitch line.


At the point where the I serge off the circle edge, I add a bit of Fray Check.


Here's Michael with just one armband attached.  I took another inch off the bottom before adding the waistband, which is relatively wide.  Cute, no?


The waistband goes on like all the other bands.  After it's attached and serged, I gently press (with steam) the seam allowance up, which is the way it naturally wants to lie.


There's a bit more pressing of seams and edges to be done, but so far, so good.

You'll notice on this sweater (and the long-sleeve one from the other day) that I do not stitch around the rib knit bands (as one usually would on a cotton jersey shirt).  It isn't necessary (the seam allowances steam quite flat) and it wouldn't look very professional on a wool sweater, imo.


I think I need a break from knits for a couple of days and no doubt you do too.

Have a great day, everybody!

Wednesday, September 18, 2013

Down to the Knitty Gritty: a Sweater Update


I'm sold: I'm sewing my sweaters from now on.

OK, maybe I won't sew every sweater, but this sweater knit thing is very cool.  It's not really hard to do once you get your technique down -- the technique being primarily how much to stretch the neckband as you stitch it onto the neck of the sweater (same goes for waistband and cuffs to some extent).  It's the same issue you'd have sewing cotton jersey, but it's actually easier with the sweater knit because the wool is much more forgiving than the knit jersey would be.


And then of course there's the serging.  But how difficult is that really?


BTW, I actually made some piping yesterday evening -- first time ever -- and tested it.  Way too thick and rigid.


As it turned out, the (four-thread) serged seams are sufficient by themselves.  I didn't reinforce them with anything like clear elastic as I've never seen clear elastic reinforcing the seams of any sweater or sweatshirt I've ever owned.


Cutting was relatively straightforward, though I was very careful not to stretch out the wool edges cut on the bias (since this is a raglan sweater, there are many).  My sweater knit is rather thick and (relatively) loose, so I had to be careful how I handled it: basically as little as possible.  I staystitched the neckline before attaching the neckband.


Once lined up, the layers hardly shifted.  Pins aren't much use with this kind of knit, though I used them occasionally when I was adding the ribbed bands.


I stitched all my seams first before serging them, and then I serged over the stitched seam, not just along the seam allowance.

As you can see, the wrong side of this wool is very fluffy.  I believe it's a mohair blend.


Finally, I did decide to add the "v" at the neckline and I'm glad I did -- the sweater is styled like a sweatshirt (wider cuffs and waistband), which gives it a sporty look.


I'll post photos of me in the sweater next week.  Tomorrow I may make Michael a sweater vest with the remaining houndstooth (there's a lot), and I still might have enough for a dog coat!

Have a great day, everybody!

Tuesday, September 17, 2013

Testing My Knits + FAKE FUR UPDATE!


No doubt some of you are eager to find out what became of the fake fur throw I bought at the Salvation Army last week but was hesitant to use for fear of bed bugs.

After reviewing your many excellent recommendations, I decided to go with the "launder it, you have nothing to lose but $5.99" camp, so yesterday evening I carried it down to the laundry room in its knotted white plastic bag, and carefully loaded it into a washer.

Long story short, it worked!  After washing it, I dried it completely and then some, for nearly 45 minutes.  The results?  It does have a bit of a laundered look -- the hairs are more clumped looking than before though this is barely noticeable from more than a foot away -- but I feel much more comfortable using it.  So thanks for all your good advice and keep your fingers crossed that any critters it might have been harboring (or their as-yet-unhatched spawn) have been eradicated!


Today I started sewing test samples of my new knits.  I changed the thread in my serger and made sure that the tension was set correctly for the sweater knits I'll be using.


I experimented with the ribbing, testing how it looked stitched next to the larger gauge houndstooth.


I also tried adding that "v" shape just beneath the collar band that you find on many (though not all) sweatshirts.  I have a vintage sweatshirt pattern that has that, and the "v" is simply an extra layer of fabric that's appliqued on with a zigzag stitch.  So that's what I tried with my sweater knit.  I think the result looks pretty good for a sample.  What's the point of that "v" anyway?

UPDATE: You can read about the origin of the "v" here.


The wrong side looks like this:


Again, from the right side:


My only question is how well this will read, given that the houndstooth is already so bold.  On the sweater I posted yesterday, the "v" and all the trim is black.  On my sweater, it's light gray.  Is it worth the trouble?   I kind of like the sweatshirt styling, which includes a somewhat wider waistband and cuffs.


Another option is piping (made with my rib knit) added to the raglan sleeve seams.  I'm just not sure if this will add too much thickness at the seam, though the seam allowances will be serged.  Maybe I need to test that too.

And that's it -- I think I'm nearly ready to start cutting -- probably tomorrow.  I don't expect the actual construction of this to take a long time; it's more about working out all the kinks before I get started.

Have a great day, everybody!

Monday, September 16, 2013

Monday Knit Picking


Feeling considerably better today, I decided to head uptown and get fabric for my next Mood project, most likely a knit sweater.

As you probably know, I don't have a lot of experience sewing with knits, though I've tackled them a few times with mixed results.  Since ready-to-wear knit cotton T-shirts are so easy to find (and cheap, especially second-hand, which most of mine are), it's hard to justify sewing my own.  I have never sewn a sweater, but that's the challenge I've set for myself, for better or for worse.

There were tons of knits to choose from, but one huge bolt standing in the wool knit aisle, apparently freshly-delivered and waiting to be shelved, was impossible to miss.  I was immediately smitten with this over-sized gray and maroon Italian houndstooth, likely a wool and mohair blend.


For a few minutes I also considered this leopard-print boiled wool, but from a distance it appeared muddy.


Luckily, I was in a decisive mood, so I followed my gut.  Ta da!


The second challenge was to find a suitable gray ribbed knit I could use for waistband, neckband, and cuffs.

These three swatches are actually different knits.   They're all a smaller gauge than the houndstooth but this was what was available.


I chose this one (the lowest one above -- or was it the top one?):


I probably have way more than I need of the houndstooth and the knit rib, so with what remains I may make a sweater vest for Michael and/or coats for the dogs.  Matching outfits!

The question that remains is whether my houndstooth would look better as a raglan sleeve or a regular sleeve sweater.  I found a photo online of this Billy Reid sweater, which is cut like a raglan sweatshirt.  What do you think?  (I won't be using a coverstitch so sweatshirt-like stitching is not an option for my project.)


I can definitely see Willy in something like this.


And speaking of Willy, guess who got a bath yesterday?  Chihuahuas are quite clean as dogs go, but they're still dogs.


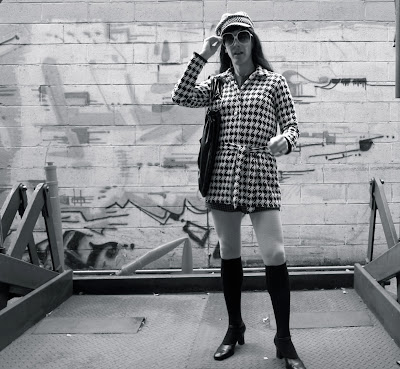
In closing, any thoughts about how best to use this houndstooth?   Of course, I do have some experience with houndstooth, back in the day of my $2/yd. polyester double knit finds...


I miss Cathy's ye-ye girl phase, don't you?

Have a great day, everybody!

Sunday, September 15, 2013

Draping the Blues Away


Readers, I've been battling a cold for the last few days and, as a result, feeling glum, and I needed to do something to lift my spirits today, so I decided to play.

I grabbed some fabric from my stash and just started draping it on my dress form (Princess Grace), simply to see what it felt like.  I loved it!  I didn't cut anything or try to create a real garment, but rather to improvise and explore how the fabric looked draped in different ways.  Some of the results look more like garments than others, but the experience got my creative juices flowing and distracted me for a few hours from feeling lousy.  I used only a few pins here and there and tied a piece of elastic around the waistline to hold the fabric there where needed.

I started with this vintage print I picked up earlier this year at the flea market.  I think it's a cotton rayon blend, but I'm not certain; it drapes quite heavily.  I didn't even iron it but just draped it wrinkles and all, but pretty soon it took on a life all its own.


Next, I chose a long piece of a red and white striped cotton, also from the flea market.  It was fascinating to see how the stripes looked when vertical, horizontal, and diagonal lines were combined.


This has a sort of Audrey Hepburn look to it, no?


Finally, I played with roughly five yards of an Ascher Studios cotton print I bought last year at Fabrics For Less.  Even though it's polished cotton, it looks a bit like taffeta.  Like the purple fabric above, this is a print that was meant to be draped.


There's something about seeing fabric hanging on a body form that's inspiring to me and makes me see possibilities that I wouldn't otherwise have if I'd started with a paper pattern.  We'll see how it goes from here, I guess.

Happy Sunday, everybody!