
No doubt some of you are eager to find out what became of the fake fur throw I bought at the Salvation Army last week but was hesitant to use for fear of bed bugs.
After reviewing your many excellent recommendations, I decided to go with the "launder it, you have nothing to lose but $5.99" camp, so yesterday evening I carried it down to the laundry room in its knotted white plastic bag, and carefully loaded it into a washer.
Long story short, it worked! After washing it, I dried it completely and then some, for nearly 45 minutes. The results? It does have a bit of a laundered look -- the hairs are more clumped looking than before though this is barely noticeable from more than a foot away -- but I feel much more comfortable using it. So thanks for all your good advice and keep your fingers crossed that any critters it might have been harboring (or their as-yet-unhatched spawn) have been eradicated!


Today I started sewing test samples of my new knits. I changed the thread in my serger and made sure that the tension was set correctly for the sweater knits I'll be using.

I experimented with the ribbing, testing how it looked stitched next to the larger gauge houndstooth.

I also tried adding that "v" shape just beneath the collar band that you find on many (though not all) sweatshirts. I have a vintage sweatshirt pattern that has that, and the "v" is simply an extra layer of fabric that's appliqued on with a zigzag stitch. So that's what I tried with my sweater knit. I think the result looks pretty good for a sample. What's the point of that "v" anyway?
UPDATE: You can read about the origin of the "v" here.
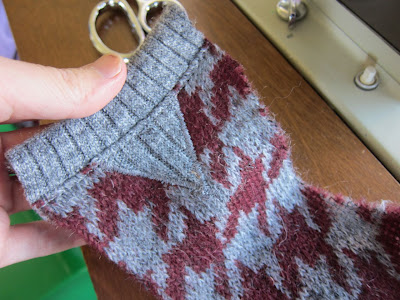
The wrong side looks like this:

Again, from the right side:

My only question is how well this will read, given that the houndstooth is already so bold. On the sweater I posted yesterday, the "v" and all the trim is black. On my sweater, it's light gray. Is it worth the trouble? I kind of like the sweatshirt styling, which includes a somewhat wider waistband and cuffs.

Another option is piping (made with my rib knit) added to the raglan sleeve seams. I'm just not sure if this will add too much thickness at the seam, though the seam allowances will be serged. Maybe I need to test that too.
And that's it -- I think I'm nearly ready to start cutting -- probably tomorrow. I don't expect the actual construction of this to take a long time; it's more about working out all the kinks before I get started.
Have a great day, everybody!
No comments:
Post a Comment