Showing posts with label Fashion Institute Classes. Show all posts

Friday, September 18, 2015

Plaid Overcoat Progress + More Pattern Drafting!


My plaid Burda overcoat is coming along slowly but surely.

On Wednesday I cut my front pockets.  They were supposed to be single welt pockets but due to a slight case of mismeasuring (and consequent cutting) they turned into double welt pockets.  A lucky save.


I'm making keyhole buttonholes myself with my Singer buttonholer (the beige plastic one that uses templates) and have incorporated a hidden button placket, which one often finds on coats like these.  Burda 7780 is a pretty stripped-down coat pattern -- no back vent, only a half lining (I'm adding a full one), and perhaps worst of all, no inside pocket (I'm adding two, for wallet and sunglasses).


As of tonight (Friday) my coat looks like this (below).  I attached the sleeves, the facings are in, and the collar just needs to be topstitched.  I still have to attach my lining pieces and insert them, and then hem the coat and add the buttons.  I hope to finish this sometime next week as I don't expect to be able to sew this weekend.


In other news, I had my patternmaking class again on Wednesday night.  We used the pattern we drafted last week to make a muslin to fit our dress form.  Here's mine: a shapely Size 8.


We then put the pinned muslin on the form and, with the assistance of the professor, corrected any fit issues.  These corrections were transferred to the paper pattern, and the now-corrected pattern was used to trace a master pattern on heavy brown paper.  That's a lot for one night, no?


I am loving this FIT patternmaking class.  The pace is perfect for me: it's fast but not overwhelming, and the professor is very enthusiastic and supportive.

And that's it.

Have a great weekend, everybody, and tune in next week for further coat updates!

My client, blue-eyed Ephraim, picked up his shirt this week.  It looks lovely on him.

Thursday, September 10, 2015

Back to School -- First Patternmaking Class!


I went back to school yesterday!

Actually, yesterday was our second class; I'd missed the first one as I was on vacation.  I nearly didn't get into Patternmaking at FIT at all because by the time I tried to register, all three sections of the class were full (they're each limited to 18 students) and for some reason they weren't maintaining waiting lists.  From Provincetown I managed to get someone in the department to find out if any of the professors would be willing to take one more student.  Fortunately for me, someone was: Professor Tamanaha.

I owned most of the supplies we'll be using already, with the exception of an L-shaped ruler, which I picked up locally on Tuesday.  The supply list includes muslin, pencils, rulers, pins, tape -- about what you'd expect.  I'm one of only two guys in the class; the rest are women.  There are a few people around my age in the class but most seem to be undergraduates or maybe just a little older than that.

The room is full of Alva body forms and each student will choose a form to work with over the semester (or so it seems).  I think most of the first class was focused on how to take the necessary measurements of the body form; luckily I was familiar with most of these measurements already.  We were given handouts on what to measure and then how to use the measurements to draft a basic sleeveless front and back bodice to fit the body form we'd chosen.


We spent most of the 3-1/2 hour class drafting, with the professor first demonstrating at the blackboard, and then all of us students working on our own.  The time flew by, though by 10 pm I was pretty fried.  I like the professor a lot -- very clear and also helpful.

Our only assignment is to complete our bodice drafts but since I finished mine in class, I'm basically homework free.  (If there's time it might be fun to draft for the body form I have at home too.)

I really enjoy all the measuring, calculating, and drafting: I find it very satisfying.  I've already done some drafting, albeit using a different formula than the one being taught in this class, and that helps tremendously.   (Clearly there are a number of different formulas people use to draft bodices, maybe with the same results and maybe not.)  So that was class #1!

Meanwhile I've been busy working on another shirt muslin (below), which I'm making entirely on my Elna Grasshopper.  I love sewing with it, though I'm not used to working on a free arm: I may consider setting up the table using the metal carrying case after all -- we'll see. 


And that's it!

Anyone ever taken a patternmaking class out there? If so, how was it?

Have a great day, everybody!

Wednesday, May 14, 2014

Menswear Sewing Class: The Dramatic Conclusion


Friends, I am well aware that after my spring break last month, I stopped providing weekly updates of my menswear sewing class at FIT.

This is partly because the last quarter of the class was largely review and partly because I got caught up in other things.  Class ended last night, alas.  It seems like we started a long, long time ago and we did: the end of January.

Yesterday we presented our final shirts -- all nicely pressed and displayed on dress forms -- and received our grades.  My shirt was the club-collared paisley Liberty I completed last week.  Other than cutting off a few stray threads and moving a button, it was exactly the same as you saw it here.

We also had a party -- we each brought a dish (mine was a dressed salad) and socialized for about an hour.  Then we said our farewells.

I gave Professsor B. a parting gift.  When I'd first shown him the Liberty-esque fabric I was using for my final project, he'd made a joke about whether there was enough for him too.  Well, at the store there was, so I picked up an additional three yards for him before the bolt was finished.  He gave me a hug.

Professor B. had very complimentary things to say about my shirt.  One criticism he had was that the edgestitching I applied to the bottom of the inside collar stand was, in places, ever-so-slightly off the bottom edge of the outside collar stand (which is hidden under the collar, naturally).   I have already forgiven myself.

The lower line of edgestitching on the inside collar stand...

...is slightly off the edge of the outer collar stand in places. 

I got an "A" -- not that anybody's ever going to ask, but as a blogger who writes primarily about menswear sewing, it does matter to me as you can probably understand.

Professor B. made a joke about my having made seventeen shirts during the class, which is a bit of an exaggeration: I made eight, always appying the techniques I'd most recently picked up in class.  I'm not sure I have a favorite -- do you?


I still haven't made up my mind about taking an accelerated summer class (which would start in just a few weeks), but I'm pretty sure I'll be signing up for "Tailoring I" this coming fall, for which Menswear Sewing is a prerequisite.  That seems a long way off though.

In conclusion, this was an excellent class which I highly recommend to anyone in the New York area interested in learning men's shirt-making techniques.   And Professor B. (as in Blackman) did a marvelous job keeping us all (and we were at many different levels) challenged and supported throughout.  It was privilege to have had him as an instructor.

You can read all my class entries by clicking the Fashion Institute Classes link in my archives.

Have a great day, everybody!

Wednesday, May 7, 2014

Thinking Cotton Cardigans + Pocket-palooza!


McCalls 5267 (above) which dates from 1976 and isn't hard to find online, looks like a fun, relatively quick project -- perhaps my next one.

Why, you may be wondering, did I purchase it, when I already own (in-print) McCalls 6803 (below), also a unisex knit cardigan pattern?


Believe it or not, when I picked up McCall's 6803, I chose the wrong size -- instead of SM-MED-LG, I bought XL, XXL, and XXXL.  Not gonna work.  Also, the vintage Seventies McCall's cardigan pattern has raglan sleeves and a more attractive collar (imo).  The torso looks more fitted too, as you'd expect from that era.


Here's the fabric I'll likely use for it.  It's an Italian terry cloth-type knit that looks surprisingly like the knit on the pattern envelope (I believe the word for this cotton is "marled.")  Squint and you'll see sunlight reflecting off the Mediterranean -- lovely.


Today I cut the pattern out (it's a single size: Small) and experimented with interfacing and buttonholes.


I was thinking this cardigan might also look cute with a belt instead of buttons, a la Marilyn on the beach.


Any preference?

In other news, in last night's penultimate menswear sewing class, we worked on pockets.  The whole class learned how to attach a regular shirt pocket, and a small group of us (well, two) also learned how to cut and attach a cargo pocket (the blue pocket below).  I'd never made a cargo pocket before and I'm not sure when I'll use one, but it's a good thing to have in my repertoire.  Ever make them?


Finally, we got to try the industrial serger, known as a Merrow machine.  The difference between this and my Brother 1034D is like the difference between a Mercedes Benz and a Yugo.  It's incredibly smooth, quiet, and powerful.  And fast, potentially, very fast.


And that's it.

In closing, would you try putting buttonholes in a loosely-woven terrycloth-type fabric or just go with a belt?

And why were McCall's pattern envelopes so much cuter in the Seventies?

Have a great day, everybody!

Wednesday, April 9, 2014

FIT Class # 11 -- Almost Finished With Our Shirt!


Last night's class was devoted primarily to closing up the sides of our shirt.

We were instructed to do this using a method identical to the one we used to attach the sleeve.  With the shirt right-side up we fold a 1/4" seam allowance on the back and back sleeve edges, we stitch at the fold and trim down to the stitching.  Then we line up the shirt front and front sleeve edge with the trimmed raw edge and stitch at approximately 1/4" (right-sides together).  OR you can line up the shirt front and front sleeve edge with the stitch line itself (which will result in a narrower seam when you fold one edge over the other).

Next, you press the seam allowance with the longer edge on top (toward the front) and topstitch it down from the right side.  Again, it's exactly the same method we used to attach the sleeve to the body of the shirt, which I detailed here.

Before class started, I showed Professor B my purple gingham shirt with the welt pocket (I was wearing it), and wondered if the reason the shoulder still seemed too wide (which he agreed was the case) was because his method uses only 1/4" from the torso side, but nearly 3/4" from the sleeve side.  He didn't agree and created a little three dimensional model to show me why.


He said that as long as the total seam allowance added up to 1" (regardless of how it's divided) the result will be the same.

Maybe it's me, but I still don't get how, if you take only 1/4" from the torso (aka, body) side and 3/4" from the sleeve, your shoulder seam won't end up 1/2" further down from where it would if both edges had a 1/2" seam allowance.   I'm thinking he means there won't be a different in the actual fit of the shirt -- yes, that's true: whether your wider seam allowance is on the sleeve or the body side of the shirt, the sleeve length will be the same; the cuff will be in the same place.  But the shoulder SEAM is going to be further down your shoulder, right?  Because you're using just 1/4 from the shirt-body side.

Your eyes are glazing over so I'll move on.  I asked Professor B. if I could use a commercial shirt pattern of my choosing to make my final shirt for class, and he said that as long as I use the techniques we've learned in class, it's fine with him.  So I think that's what I'm going to do, rather than keep tinkering with the size Small pattern he had me trace that is still too full on me (for my taste).  He did compliment me on my double-welt pocket, btw!

Privately, Professor B. showed me how to make both a covered front button placket and an attached placket (The dickey, you'll recall, had a simple turnback placket).


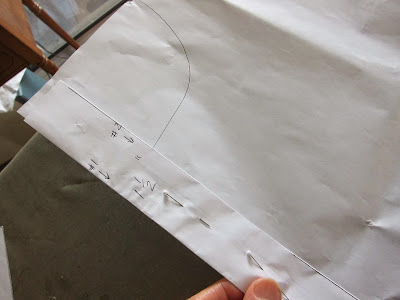


Nothing complicated about these plackets as long as you know the measurements to use.  They both result in a front left placket that's 1 1/2" wide.  I'll likely demonstrate these the next time I make a shirt, probably in the next week or so.

CF stands for Center Front; the measurements to the left are the extensions added to create a covered placket. 

Finally, as a bit of extra enrichment for everyone, Professor B. taught us how to prick stitch a collar edge and cuff by hand, instead of topstitching by machine.  We're not required to do this, but he thinks it's a nice touch (It's usually seen on better jacket lapels.).   He modeled a Canali shirt with a prick-stitched collar.  It's not a look I love but it certainly looks more hand-worked, i.e., expensive.  (Canali shirts seem to go for a minimum of a few hundred dollars each.)

And that's it.  Next week we're off for spring break, then we'll attach our cuffs and hem our shirts.  Maybe in the meantime I'll make another shirt -- with a lace overlay!


Have a great day, everybody!